Using SDL with Xcode 4
Apple changed the format for project templates in Xcode 4. The format change means the Xcode templates that ship with the Mac version of SDL don’t work in Xcode 4. If you have both Xcode 3 and 4 installed on your Mac, you can create a project that uses SDL in Xcode 3 and open it in Xcode 4. But if you’re running Xcode 10.7 and don’t have Xcode 3 installed, you’re stuck with Xcode 4 and can’t use the SDL project templates. But you can use Xcode 4 to create SDL applications without too much hassle.
While I wrote this article for Xcode 4 and SDL 1.2, most of the material in the article still applies to Xcode 5 and SDL 2. Some of the screenshots will look slightly different in Xcode 5, and any reference to SDL.framework should refer to SDL2.framework in SDL 2.
Create a Cocoa Application Project #
When you create a project in Xcode, select the Cocoa Application project, as you can see in the following screenshot:

The Mac OS X version of SDL is written with Cocoa so a Cocoa application project is the closest template to the old SDL project templates. Click the Next button to move to the next step where you name the project.

Deselect the Create Document-Based Application, Use Core Data, and Use Automatic Reference Counting checkboxes. SDL games don’t use Core Data or Apple’s NSDocument class. Automatic Reference Counting is for Objective-C code, which most of you won’t use if you’re using SDL. If you want to unit test your game with OCUnit, select the Include Unit Tests checkbox. My Using Xcode to Unit Test SDL Games Written in C++ post has detailed information on using OCUnit to unit test C++ code.
Click the Next button to move on to the final step of creating a project. Pick a location to save the project and click the Create button. If you want to place your project in a local git repository, select the checkbox to create the repository.
Remove Unwanted Files from the Project #
Apple’s Cocoa application project template contains files that are not needed for SDL games. You can remove the xib file and source code files from the project: any files ending in .xib, .m, and .h. In Xcode 4.2 you would delete the following files: main.m, MainMenu.xib, AppDelegate.h, and AppDelegate.m. Select a file and choose Edit > Delete to delete the file from the project. An alert opens. If you click the Delete button, Xcode deletes the file instead of moving it to the Trash. Clicking the Remove Reference button is the safer option. My Xcode 4: Removing Files from a Project post has additional information on removing files from a project.
Add the SDL Framework to the Project #
Now it’s time to add the SDL framework to the project. Select the project file from the project navigator to open the project editor. Select your target from the left side of the project editor. Click the Summary button at the top of the editor to see a list of linked frameworks. Click the + button to add a framework. More information on adding frameworks is in my Xcode 4: Adding a Framework to Your Project post. Click the + button to add any additional frameworks, such as OpenGL, SDL_image, and SDL_mixer.
Add SDLMain to the Project #
The Mac version of SDL uses two files, SDLMain.m and SDLMain.h, that contain glue code for running SDL code on Mac OS X. The SDL project templates include these files, but in Xcode 4 you must add them to your project. Choose File > Add Files to ProjectName to add the files. After adding the SDLMain files to the project, you can start coding.
SDL 2 Note #
SDL 2 has no SDLMain files to add. You can skip the Add SDLMain to the Project step if you’re using SDL 2.
Add Search Paths #
When I tried to build a SDL project with Xcode 4, I got a build error saying that the file SDL.h was not found. The solution was to add the following search path to the Header Search Paths build setting:
/Library/Frameworks/SDL.framework/Headers
You may also need to add a search path to the Framework Search Paths build setting, but I didn’t need to add a path. You may also need to specify additional search paths if you use additional frameworks, such as SDL_image and SDL_mixer. My Xcode 4: Accessing Build Settings post has detailed information on accessing build settings in Xcode 4.
Copy the SDL Framework to Your Application Bundle #
The SDL Xcode project templates copy the SDL framework to your application bundle. Copying the framework to the application bundle allows someone to play your SDL game without having SDL installed. If you want the SDL framework added to your application bundle, add a Copy Files build phase to your target and add the SDL framework to the build phase.
- Select the project file from the project navigator to open the project editor.
- Select the target from the left side of the project editor.
- Click the Build Phases button at the top of the editor.
- Click the Add Build Phase button at the bottom of the editor. If you’re using Xcode 5, choose Editor > Add Build Phase > Add Copy Files Build Phase and skip Step 5.
- Choose Add Copy Files from the menu.
- Drag the SDL framework from the project navigator to the table in the Copy Files build phase.
- Choose Frameworks from the Destination menu.
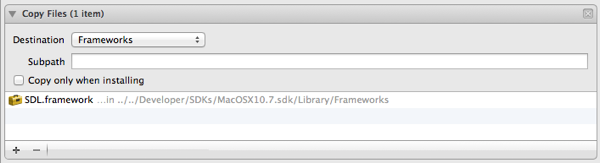
If you have additional frameworks to copy to the application bundle, repeat Step 6 for those frameworks. Don’t copy Apple’s frameworks to the application bundle; every Mac has Apple’s frameworks installed. Only copy third-party frameworks, such as SDL_image and SDL_mixer.
If you find the SDL framework isn’t being copied into your application bundle, take a look at Adam’s comment, comment #5.