Creating a Document-Based Mac Application Using Swift and Storyboards
August 7th, 2017
Filed under: Cocoa, Mac Development | 29 comments
I continue my writing on crafting modern Cocoa applications with Swift and storyboards. In this article you’ll learn about building document-based Cocoa applications by developing a simple text editor. I hope this article and project provide a gentle introduction to building document-based Cocoa applications in Swift.
If you haven’t read it already, I recommend reading my Creating a Simple Mac Application Using Cocoa, Swift, and Storyboards article. It provides more detailed information on some steps I gloss over in this article.
Create the Project
Let’s start by creating a new project. In Xcode choose File > New > Project to open the New Project Assistant. Select Cocoa Application, which is in the macOS section. Click the Next button to move to the next step.
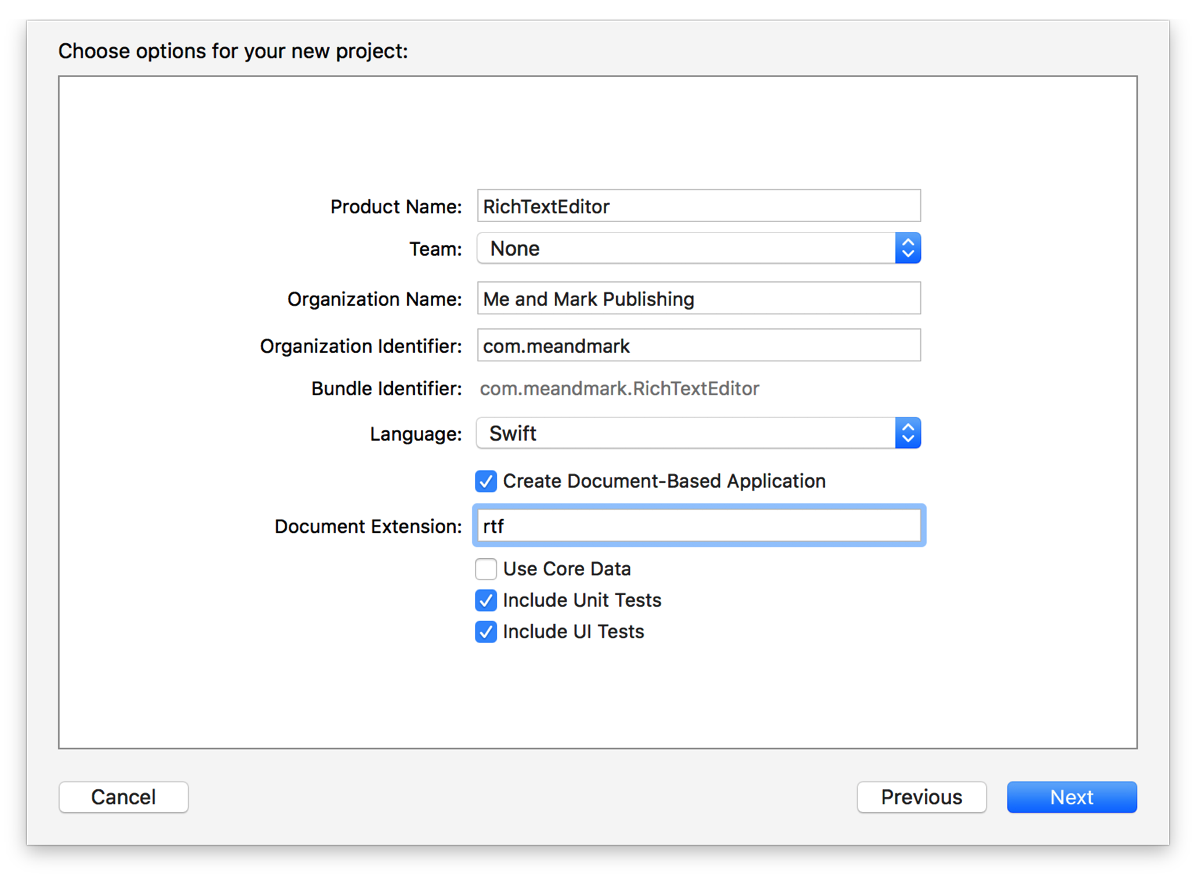
Enter a name for the project in the Product Name text field. Select None from the Team menu.
Select the Create Document-Based Application checkbox and deselect the Use Core Data checkbox. Enter rtf in the Document Extension text field because the project saves RTF files. RTF stands for Rich Text Format, a text file format the Cocoa text system natively supports.
Click the Next button to move to the last step of the project creation process. Choose a location to save your project. If you want to put your project under version control, select the Create Git repository checkbox. Click the Create button.
There are three files you will work on in the project.
Main.storyboardcontains the user interface.ViewController.swiftcontains the code for the view controller.Document.swiftcontains the code for the document. The document is a subclass ofNSDocument.
The names ViewController and Document are generic. I kept these names for this project because there’s only one view controller in the project and a text editor deals with documents. If you write your own document-based applications, you would benefit from renaming the classes and files ViewController and Document to something more descriptive.
Create the User Interface
Select the storyboard from the project navigator to open it. At the start, the storyboard should look like the following:

Xcode provides a menu bar, a window controller for an empty window, and a view controller for the window’s content view. Start by selecting the label that says Your document contents here and deleting it by pressing the Delete key.
Add a Text View
The user interface for this project requires only one additional interface element: a text view. Find the text view in Xcode’s object library. Drag the text view from the object library to the view controller. Resize the text view so it fills the content view.
Tell the Text View to Use the Inspector Bar
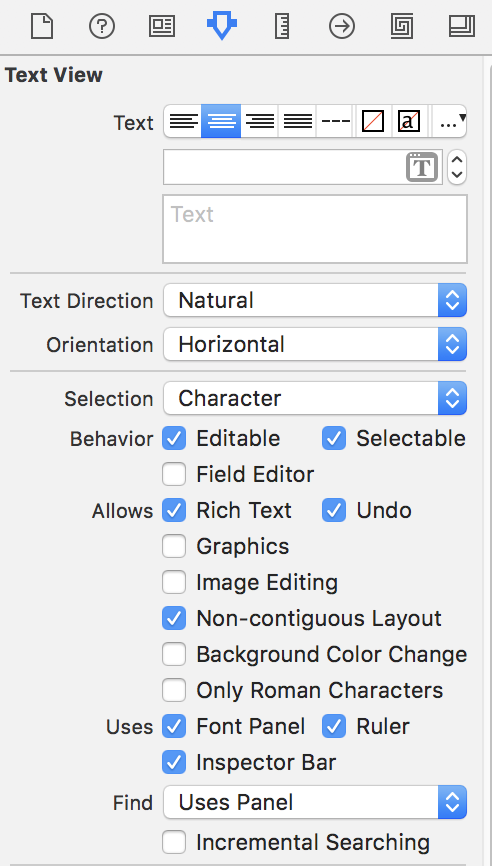
The inspector bar provides controls to do things like change the font, set the text alignment, and add lists. Using the inspector bar isn’t mandatory, but it makes text editing more pleasant.
The nice thing about using the inspector bar is it requires no additional code. Select the text view and open the attributes inspector. Select the Uses Inspector Bar checkbox.
Create an Outlet for the Text View
Select the file ViewController.swift from the project navigator. Create an outlet for the text view so you can access the text view in your code.
@IBOutlet weak var textView: NSTextView!
Now connect the text view in the storyboard to the outlet you just created. Open Xcode’s assistant editor so the files ViewController.swift and Main.storyboard are open at the same time. Choose View > Assistant Editor > Show Assistant Editor to open the assistant editor. Open ViewController.swift in one editor and Main.storyboard in the other editor.
Select the text view in the storyboard. Hold down the Control key and drag it to the textView variable in the source code file to connect the outlet.
Resize the Text View When the Window Resizes
At this point you could build and run the project and have a mostly functioning text editor. You can create documents, enter text, cut and paste, choose fonts, and print documents. But you’ll notice a problem if you make the window larger. The text view stays the same size so you get empty space when you make the window bigger.
The next step is to make the text view resize when the window resizes so the text view fills the window. Select the text view’s scroll view and open the size inspector. In the autoresizing section, click the two arrows in the inner square.

Save and Open the Document
To make the text editor usable, you must save documents to disk and open those documents. Saving the document involves writing the text view’s contents to a file. Opening the document involves reading the saved data and filling the text view with the file’s data.
Accessing the View Controller from the Document
Remember that saving the document involves writing the text view’s contents to a file. To retrieve the text view’s contents, the document needs to access the view controller, which holds the text view. Add the following code to the Document.swift file to get the view controller:
var viewController: ViewController? {
    return windowControllers[0].contentViewController as? ViewController
}
The code takes advantage of the fact the document has only one window controller. Access the first item in the windowControllers array and get its content view controller.
Saving the Data
To save the document you must override the function dataOfType. Fortunately Xcode provides a shell of this function in the Document.swift file.
override func data(ofType typeName: String) throws -> Data {

}
Your job is to write the function, which saves the text view’s contents.
override func data(ofType typeName: String) throws -> Data {
    // Save the text view contents to disk
    if let textView = viewController?.textView,
        let rangeLength = textView.string?.characters.count {

        textView.breakUndoCoalescing()
        let textRange = NSRange(location: 0, length: rangeLength)
        if let contents = textView.rtf(from: textRange) {
            return contents
        }
    }
    throw NSError(domain: NSOSStatusErrorDomain, code: unimpErr, userInfo: nil)
}
The function starts with a nested if-let statement. The outer if-let statement grabs the text view. The inner let statement gets the length of the text view’s contents.
The call to breakUndoCoalescing preserves the tracking of unsaved changes and the document’s dirty state so that saving the document doesn’t mess with them.
The next two lines of code build a range for the text view’s contents and supply the range as an argument to the NSText function rtf. The rtf function converts the text view’s contents to RTF for saving.
The throw statement at the end opens an alert if the save fails.
Notice that you don’t have to open a Save panel to save the document. Cocoa’s document architecture handles that for you.
Loading the Data
To load the data from disk, you must override the function readFromData. Xcode supplies a shell of the function for you to fill in the Document.swift file.
override func read(from data: Data, ofType typeName: String) throws {

}
Start by adding a property to the Document class to store the saved text.
var text = NSAttributedString()
In the readFromData function create an attributed string with the file’s RTF contents. Set the text property to the attributed string you created.
override func read(from data: Data, ofType typeName: String) throws {
    if let contents = NSAttributedString(rtf: data, documentAttributes: nil) {
        text = contents
    }
}
I used an if-let statement instead of setting the text variable directly to avoid dealing with Swift implicitly unwrapped optionals. Implicitly unwrapped optionals can crash your application if the optional value is nil. Avoid using implicitly unwrapped optionals when you can.
You might be wondering why the readFromData function doesn’t set the text view’s contents. My initial attempt at writing the code for this tutorial did set the text view’s contents. But I discovered that when loading a document, readFromData is called before the storyboard loads the window controller and view controller. This means if you try to access the view controller in readFromData, the view controller doesn’t yet exist. Because the view controller doesn’t exist, you can’t access the view controller and text view from readFromData.
Filling the Text View with the File’s Contents
The last step is to fill the text view with the loaded document’s contents. Override the viewDidAppear function in the view controller.
override func viewDidAppear() {
    // Fill the text view with the document's contents.
    let document = self.view.window?.windowController?.document as! Document
    textView.textStorage?.setAttributedString(document.text)
}
The first line of code in viewDidAppear accesses the document. The second line sets the text view’s contents to the document’s text property, which contains the data stored in the file.
You might be wondering why I overrode viewDidAppear instead of viewDidLoad. viewDidAppear is called after the storyboard and document are loaded so I can be sure the document exists. If I overrode viewDidLoad, the document wouldn’t exist when viewDidLoad was called, and the program would crash.
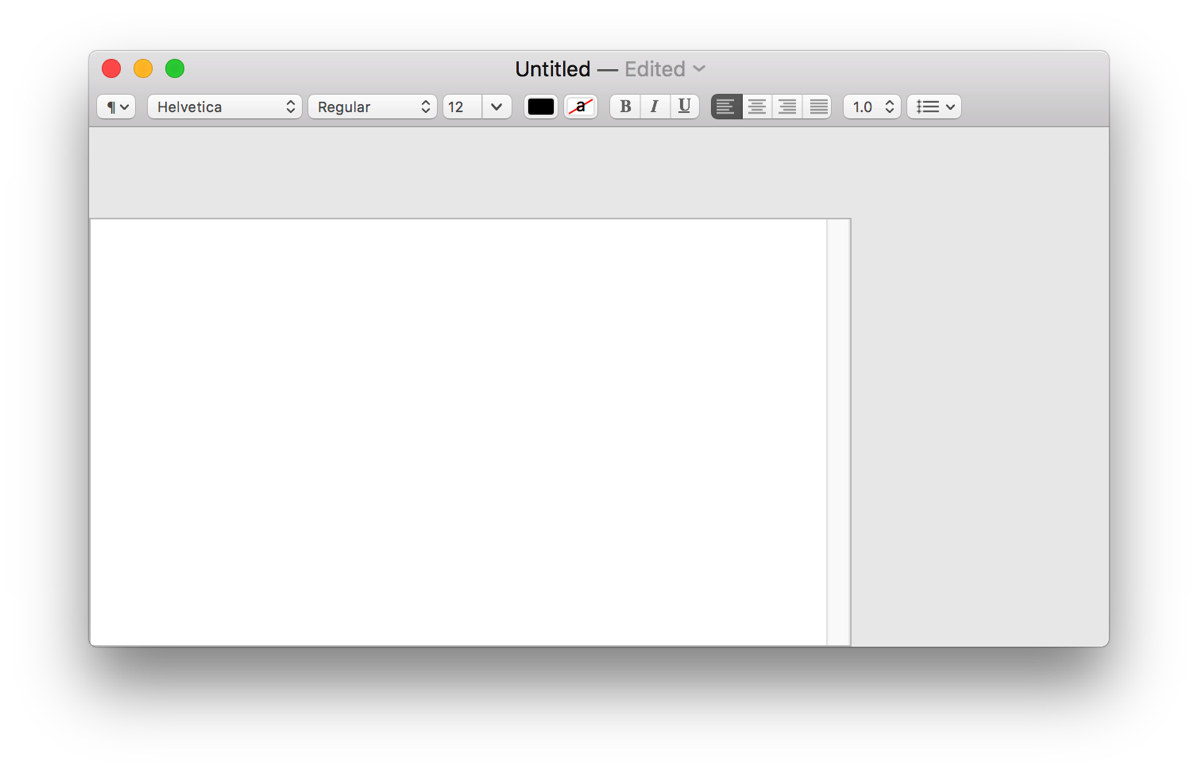
If you build and run the project, you should be able to save and open documents.
Conclusion
If you made it this far, congratulations. You wrote a usable text editor. Now you can see why there are so many text editing applications on the Mac. Adding a text view provides most basic text editing functions so you don’t have to reinvent common behavior. Cocoa’s document architecture handles opening Save and Open panels, reducing the amount of code you have to write. There’s fewer than 20 lines of code to write in this project.
The project is on GitHub for you to download if you have trouble building or running the project.
If you want to learn more about developing document-based applications, read the Document-Based App Programming Guide for Mac, which is part of Apple’s documentation.
Tags: storyboard, swift
Hi,
Thank you for this article.
But I have one question : is it possible to use a IBAction in document.swift, else is it possible to use a document.swift’s func in viewcontroller ?
Yann,
To call a document’s function in a view controller, the view controller must access the document. The first line of the viewDidAppear() function in the article shows how the view controller can access the document. Once you have access to the document, call the function.
It is definitely possible for a document to have IBActions. The tricky part is connecting the IBAction so it gets called. In most cases you connect the user interface element or menu item to the First Responder object to connect the IBAction.
To load a textview with text from a file that’s selected say from a drop down list or tree–some kind of click method–would it be accurate to say that you’d simply call the document opening function on click, rather than using the “open file” interface?
B Palmer,
You are correct that you would not use an Open panel to open the file and load its contents in a text view. I don’t think Cocoa’s document architecture would work well in your example. The document architecture has either one file or one file package. There would not be one document for each file in your drop down list.
In the situation you described, you would get the URL of the selected file and use the URL to load the file, get the text from the file, and load the text in the text view.
Hi,
I followed all the instructions and retried many times, but I couldn’t manage to implement the “Save As..” functionality. Actually, I’m able to edit already created .RTF files, but I can’t create them… I know it’s been a year since this article was written, but I hope this technique is always working..
Milou,
The first thing I would check is to make sure the Save and Save As menu items are connected to the First Responder’s saveDocument IBAction. Use the connections inspector in Interface Builder to check the connections. If the Save or Save As menu items are missing the connection to saveDocument, make the connection from the menu item to the First Responder object in the application scene.
If you are still unable to save, you will have to provide some more specific information. What do you specifically mean by “couldn’t manage to implement the Save As functionality”? Are the Save and Save As menu items disabled? Does choosing Save As not bring up a Save panel? If you set a breakpoint at the start of the dataOfType function, does Xcode hit that breakpoint?
One last thing. I have the project on GitHub. You can compare your version to mine. There’s a link to the GitHub repository at the end of the article.
I have a tableView app with 12 columns of data created mostly by cutting and pasting. I have a setDirty() function in the document, windowController?.setDocumentEdited(true) that I call on every change. Yet when I quit the app I don’t get the save dialog. What am I missing? Do I need to call something from the Application Delegate?
Larry,
The documentation for NSWindowController’s
setDocumentEditedfunction says you should never call it directly.What works for me is to call NSDocument’s
updateChangeCountfunction and supply a change type. Updating the change count signals that the document has been edited and needs to be saved. Here’s an example of callingupdateChangeCount.document.updateChangeCount(NSDocument.ChangeType.changeDone)Basically the same question as Milou above. In the inspector, the file menu shows “Save as,” the First Responder shows the connection to saveDocument (as does the menu item), but when it’s running the app menu shows “Duplicate” where I’d expect “Save as.”
duplicate in the connections inspector is not shown connected to anything.
Any suggestions? (Preview has much the same behavior, which always drives me nuts.)
Ron,
My best guess is that the Duplicate menu item is the new default behavior on Mojave for document-based apps. When I create a brand new document-based app project in Xcode 10.1 and run it, there’s a Duplicate menu item instead of Save As. When I create a new Cocoa app that’s not document-based, the menu item says Save As. I also noticed Xcode, TextEdit, and Preview also have a Duplicate menu item on Mojave.
After doing some web searching, it appears Apple’s default behavior is to hide the Save As menu item. The following article shows how to restore the Save As menu item:
How to Get “Save As” Shortcut in MacOS Mojave
Should have checked back sooner. There’s a programmatic way to fix this. In the NSDocument subclass:
override class var autosavesInPlace: Bool {
return false
}
Voila! Save-as behavior works as before.
Do you know if there are any specific build settings required here? I’m running on Mojave, Xcode 10.0, and when I click the save button I get the following error: “-[NSVBSavePanel init] caught non-fatal NSInternalInconsistencyException ‘bridge absent’ with backtrace (” followed by a bunch of info
Tyler,
When I searched for the error message, [NSVBSavePanel init] caught non-fatal NSInternalInconsistencyException, I found that it involves the App Sandbox. When you create a new Cocoa app project in Xcode, the App Sandbox is turned on, and it limits your access to Save and Open panels.
The easiest thing to do is to turn off the App Sandbox. Read the following post from this blog to learn more about how to deal with the App Sandbox:
Xcode Turns on the App Sandbox for New Cocoa Projects
Hi – I have a split view controller as my window contents, with a text view in the first of the split views.
I’m stuck on modifying the following to get the appropriate viewController – I think it’s currently getting the split view controller successfully, not the controller for the first child view, as wanted.
var viewController: ViewController? {
return windowControllers[0].contentViewController as? ViewController
}
Steven,
The split view controller is the window’s content view controller. If you want to access the text view’s controller, you have to get the split view controller and use the split view’s controller’s
childrenproperty to get all the child view controllers. In your case the text view controller is the first element in thechildrenarray. Something similar to the following:var viewController: ViewController? {let splitViewController = windowControllers[0].contentViewController as? ViewController
return splitViewController.children.first
}
Keep in mind the sample is for demonstration only. It may generate syntax errors due to dealing with optional values.
In Xcode 10.0 I see three text views in the Object Library: Scrollable Text View, Rich Document Content View, and Plain Document Content View. None of these, when added to the View Controller offer a Text View section in the Attributes Inspector, which only has View and Scroll View sections.
Is there a generic Text View I need to find in the Object Library? Or is there a way to get the Text View section in the Attributes Inspector with any of the three aforementioned text views?
Andre,
If you are following along with the tutorial, go with the Rich Document Content Text View item because it is configured to display rich text instead of plain text.
I tried adding a rich document text view to a new document-based Mac app project in Xcode 10.2.1. I cannot reproduce your issue. I can access the text view in the attributes inspector. The text view is in the following hierarchy in the view controller scene:
View > Scroll View > Clip View > Text View
You should be able to access the view controller’s view hierarchy from the jump bar or the document outline, which is to the left of the canvas. If you don’t see the document outline, click the button on the left side below the canvas to see the outline. Any of the three text view options should allow you to access the text view in the attributes inspector.
I had the document outline hidden, and when I opened it, View > Scroll View was selected. Clicking Scroll View > Clip View > Text View did the trick. Thanks for your help!
I gave up on getting a textview in a splitview controller working, and went back to getting the above all going, which I have, except for opening a (previously-saved) document. I can create a document, type in some text, turn on the ruler and change the tab stops, then save it. The resulting document will open in Apple’s TextEdit, with the ruler settings as I saved them, but if I try to open any rtf from this I get the following (with App Sandbox turned off in XCode):
2019-06-22 06:37:24.697266+1200 RichTextEditor[1444:2207113] [default] RETURNING UnknownFS PLACEHOLDER: A7E439A2-A6EC-3866-98A0-AFD534616570
2019-06-22 06:37:28.412320+1200 RichTextEditor[1444:2207265] errors encountered while discovering extensions: Error Domain=PlugInKit Code=13 “query cancelled” UserInfo={NSLocalizedDescription=query cancelled}
Got it to open rtf documents by commenting out the:
throw NSError(domain: NSOSStatusErrorDomain, code: unimpErr, userInfo: nil)
line, which XCode had provided in the read(from data:,ofType typeName:) function stub (while leaving the identical line in data(ofType typename:) uncommented-out).
The following still appears in the log, but no longer prevents the file opening:
2019-06-22 07:19:41.631923+1200 textPadStack[2431:2230328] errors encountered while discovering extensions: Error Domain=PlugInKit Code=13 “query cancelled” UserInfo={NSLocalizedDescription=query cancelled}
Steven,
I don’t know what’s causing the query cancelled log message. I get that log message sometimes but not every time I open RTF files.
I found a fatal issue that I was hoping someone could point me in the right direction on. When I write text in the view and then minimize the window, reopening it causes all of the text to disappear. Other than that, everything is working for me. I was wondering if anyone knows of a way to fix this issue.
Mark,
I ran the project and noticed the same issue.
The fix is to have the document register for the notification
NSWindow.didMiniaturizeNotificationand save the text view contents in the document’stextproperty when the window minimizes. You can see some example code in the GitHub project in the minimize-window branch or the master branch. Look at the file Document.swift.Hi! Hope you’re doing great. This article was INCREDIBLE! Absolutely loved it. Was looking for such a solution for a long time.
I’m working on a word processing app for macOS which has some special abilities (I can’t post them right now as I’m still developing it; hope you understand). I have been able to design everything and get all the functions to be working except that saving file thing. Now that I’ve understood your solution, I was wondering if I could use that code in my app? I will be sending that app to Apple for macOS App Store, so yes, it would be kind of for commercial use. Would it be fine to use the code from document.swift file and some code from viewcontroller.swift file (from your GitHub) in my own project? If not, can I use it by crediting you in the code? Please let me know! Would really appreciate it. I’m a student and have been working on my project for over a month now and don’t want all of it to go to waste just because of one ‘Saving’ functionality.
Hoping to hear from you. Thanks, and happy holidays!
Noor,
You can use the file saving code in your app.
What I would object to is someone taking the GitHub project, adding an app icon, adding nothing else to the app, and selling it. That would be a rip off, charging people money for a basic text editor.
Thanks a ton! Means a lot. Also, you’ve mentioned in the article that “The code takes advantage of the fact the document has only one window controller”. It seems like this only works when you have textView in just one view controller. What should we do if we have textView in two different view controllers? Like imagine there’s a primary viewcontroller which has two buttons A and B. If the user clicks on A, he goes to Viewcontroller alpha and if he clicks on B then he goes to view controller beta. (Both viewcontrollers cannot be opened at the same time). How can we make the code work so that when we use the save function in this kind of scenario, it works without flaw? When I used this code with the above mentioned scenario, I get the error “Fatal error: Unexpectedly found nil while unwrapping an Optional value”. Any help would be appreciated. Thanks a ton!
Noor,
I have never dealt with the situation of having a text view in multiple view controllers. I don’t have an answer for you.
Trying to do the same but without storyboard. So Xcode 11.3, new project, macOS app, language Swift, document-based and XIB user interface. This gives a Document.XIB file with a single window and no view controller.
I can create a Scrollable Text View (Plain Content Text View) and control-drag to create an Outlet in the Document sub-class / Document.swift source file, but Xcode won’t let me create an Action anywhere.
I’m completely stuck – it seems that every tutorial/blog/example on-line is using Storyboards, not XIBs. I wondered if you could tell me, please, what I need to do in order to be able to create an Action on the TextView for an XIB project?
Other fields, such as a Search field work fine – I can create Outlets and Actions with a simple control drag.
Bruce,
I can confirm the issue you’re having. There is no way to create an action for a text view. It is possible to create an action for a text field in the NSDocument subclass.
My guess is that text views aren’t meant to work with actions. Editing text is the action you perform with text views.
Mark